Most of the materials for a college application come with guidance from our school’s University Counselor. The portfolio, though, is not something the Uni Counselor covers.
So where’s the difficulty in DIY-ing your own portfolio? Why does almost everyone end up looking for an agency? How to actually make a portfolio, how to close the information gap, how to get objective and mature feedback, how to keep executing under a tight deadline — these are more or less the core services people are paying an agency for. My hope is that by reading this, every information gap around a portfolio’s format, process, submission, and school preferences gets broken down and understood. That way, before you even start creating, you won’t be stuck in place by “I have no idea where to begin”, and can put more of your energy back into the work itself.
How This Piece Is Structured, and Who It’s For
First, take a look at whether any of the majors below are ones you’re thinking of applying to.
For undergraduate study abroad, creative majors generally require a portfolio. These include:
- Art and Fine Art
- Design and Applied Arts
- Architecture and Spatial Design
- Media and Film/TV
This piece starts from the relative basics: what a portfolio is, how it relates to the rest of your application, how to think about choosing schools and majors, and a general approach to making one.
The first half stays broader and applies to most people preparing a creative portfolio; the second half gradually narrows to my own application field (industrial design). I won’t walk through specific software tutorials or technical steps — the focus is more on ways of understanding a portfolio: how to think about projects, medium, layout, school preferences, and the application narrative.
Whether you plan to DIY or to find an agency, as long as portfolios leave you feeling lost, this piece should give you a relatively systematic understanding.
Getting to Know the Portfolio
How do you get to know a person?
There are many mediums: messages online, the way they look, their voice on a call, their social media profile… For you, the channels for getting to know a university include its official site, social media, summer programs, etc., over a span that can be measured in months, or even years. For an admissions officer, the only channel for getting to know you is your application, over a span measured in minutes.
Your application sits in the middle of this: it’s the personal calling card you build day and night, and it’s the university’s quick, compressed medium for getting to know you.
So, for an applicant, what matters is this:
One: whether you understand well enough what you want out of university. That place you’ll probably spend four years in — what do you want from its ranking, country, major, environment, weather? Write down those wishes, the practical ones and the odd ones alike, and then go looking for the universities that match them.
Two: whether you understand well enough the universities you’re applying to. Ten schools at most — do they fit what you need, and what kind of applicant are they hoping for?
Three: which parts of yourself you want to present to them. To get to the place that’s right for you, what do you already have, and what do you still need to work on?
That process of exploring and weighing things out becomes the narrative of your application. And for creative majors, they need to see something beyond your Personal Statement and test scores — a collection of visuals, layouts, and sounds that lets them understand your creative ability more fully. That is your portfolio.
So there are two things to understand before you start building a portfolio.
First, it forms your “personal calling card” together with the rest of your application. Your Personal Statement, test scores, and portfolio should add up to one coherent impression. Lean into what each type of material does best as a medium, and let each express the part it’s good at.
Second: if I asked you to do a 30-second gesture drawing, would you fuss over the fine details of the figure? Probably not. You’d sketch the figure’s overall shape first, and only render details where they’re necessary. Since an admissions officer doesn’t have time to take in your whole life, your portfolio’s narrative should likewise be built from its “shape” plus the details that matter. Highlighting the parts you want to show also means keeping too much complicated information from drowning out the main thing. Quality > quantity. (PS: this doesn’t mean a portfolio can only talk about one theme, though. As your “personal calling card”, different works can look at different questions and use different mediums; but placed together, they should still feel like they come from the same creator. That coherence can come from your interests, your way of observing, your aesthetic sensibility, the questions you care about, or the recurring habits of thought that show up as you push a project forward.)
By now, a portfolio is at least no longer just some unfamiliar attachment to your application. It’s one of the mediums a university uses to get to know you quickly, and it’s the multimedia material through which you show your thinking, your technique, and your creativity.
How to Begin
From the previous section, you should have a first sense of what a portfolio is: it needs to come together with your Personal Statement, your school choices, and your intended field into one relatively coherent impression.
Before you actually begin, ask yourself a few questions:
- What do I care about?
- What am I good at?
- What am I willing to put my time into?
- How do I turn a vague feeling into a piece of work that other people can understand?
If you start without ever having thought about these, you’ll likely get half the result for twice the effort — a portfolio that looks like it has a lot in it, but where nothing seems to point anywhere or show anything in particular. Even without clear answers, please carry these questions with you as you start exploring, and fold them into the exploring and making you do.
If you’re starting early, you can work forward slowly along three threads: your interests, your intended field, and school preferences. Besides doing it in your own free time, you can also smuggle some of the workload into your IB coursework (e.g. VA Artwork, DT IA, projects in other subjects, Zhixing projects, school activities (e.g. Kuncheng Spark), etc.).
If you’re starting late, you don’t necessarily have to build from scratch. You can comb through the projects you’ve already finished in high school to pull out your portfolio’s main narrative (as above), then fill in whatever’s missing. What matters most is to avoid dropping them into the portfolio exactly as they are; instead, adjust each project’s center of gravity or its presentation to fit the narrative you want to tell.
If you’re anxious about not having enough time, here’s how it went for my own portfolio: school selection, my first sitting of standardized tests, Personal Statement, portfolio — all of it started only in mid-July of the DP1 summer and wrapped up in early November. About three and a half months, start to finish. This timeline isn’t one to imitate, but it does go to show that even under real time pressure, the approach of pulling a main narrative out of existing projects and filling in the gaps does work.
Of course, the cost is pretty direct too. The later you start, the more you’ll have to sacrifice sleep, energy, and emotional stability, and you’ll run straight into the workload overflow of school Predicted Grades, IAEE submissions, and the like. Beyond making the work itself, a portfolio comes with a huge amount of invisible labor. So starting early really is better (´-ω-`) you’ve only got so much life force to burn.
A Few Words on Choosing Schools and Majors
After reading the starting advice above, it helps to first lay out your own needs and abilities.
When the day comes to choose schools, you can start with a wide-net filter — consulting AI, chatting with your Uni Counselor — and then dig deeper through school websites, domestic social media, Reddit, and other platforms to settle on the ten schools you’ll apply to. Below are a few dimensions worth considering when choosing schools and majors.
Comprehensive Universities vs. Art Schools
When it comes to art and design, schools break down roughly into comprehensive universities and independent art colleges. Let me lay out the differences simply.
Comprehensive universities have the edge in being cross-disciplinary and varied. You’ll find it easier to reach resources across the humanities, social sciences, STEM, business, etc., and easier to combine art and design with other fields. That said, the artistic atmosphere at a comprehensive university isn’t necessarily as thick as at an independent art college; how much resource and attention art students get really depends on the specific school and program ranking.
Independent art colleges have more focused resources, a more concentrated artistic atmosphere, and make it easier to go through intense studio training. Creative freedom, community, a tightly focused set of industry contacts and an alumni network are often their strengths. Tuition, however, tends to be high; and if you’re thinking about working back home someday, recognition of an overseas independent art college within the system may be lower than for a comprehensive university.
And if you’re saying, I want to experience both! — that’s not impossible either. Brown and RISD, for instance, sit right next to each other, and students can reach another school’s courses and resources through cross-registration. The two also jointly run a five-year dual-degree program (BRDD), where you pick a concentration at Brown and a major at RISD, and graduate with two degrees.
Rankings
A general rule: for art and design, subject rankings usually tell you more than overall rankings, because they sit closer to the “art and design” field itself.
For traditional fine-art directions like fine art, illustration, and sculpture, an independent art college’s artistic atmosphere, studio culture, industry contacts, and alumni network are often hard for a comprehensive university to replace. The QS Art & Design ranking can be one reference point. Each school also has its own character — RISD, for example, leans more toward traditional craft and studio training, while ACCD leans more toward commercialization and career orientation (which isn’t to say RISD has no career guidance, or that ACCD has no tradition or training, okay).
For design majors — visual communication, product, interaction, and so on — both comprehensive universities and art schools are worth considering. Design itself often crosses into other fields, so comprehensive universities may have an advantage in tech integration, interdisciplinary resources, and research opportunities; independent art colleges are more concentrated in studio atmosphere, visual training, and sheer density of making. When you look at rankings, judge by combining the QS overall ranking, the QS Art & Design ranking, and the actual course structure of the specific major.
For architecture, landscape, and urban design, comprehensive universities and art schools each have their pros and cons. Weigh them against your own needs, and pay attention to specialized architecture rankings, whether the program is accredited, studio culture, location, and internship resources. If you’re considering working in the US, you can also look at STEM designation and reputation within the industry.
For media, digital media, and animation, comprehensive universities and art schools again each have their pros and cons. For rankings you can look at media, art-and-design, or computer-science-related lists, but what matters more is still the specific program.
Beyond rankings, depending on your specific needs, pay plenty of attention to course structure, portfolio requirements, location, industry resources, where graduates end up, and the feel of the school.
Countries
The US: relatively abundant in educational resources, commercial application, interdisciplinary innovation, and industry contacts — and usually the most expensive. IB is fairly well accepted, and some schools have mechanisms to convert IB into college credit, though you’ll need to confirm the exact policy school by school.
The UK: a blend of the classical and the modern, and some art and design programs care especially about your creative process, the depth of your research, and the logic of your portfolio. Degrees are shorter — usually three years for a bachelor’s and one for a master’s. Applications may have explicit requirements around predicted grade, final grade, and your IB subject choices.
Europe: compared with the US, some European countries put less pressure on you through tuition, and each has its own cultural depth and design tradition. But language, visas, cost of living, the language of instruction, and course requirements vary a great deal. Some programs accept IB, and may also require you to make up specific subjects or meet the local language requirement.
Japan and Korea: Japan has a strong tradition in craft, product, architecture, and animation, while Korea is more developed in visual, fashion, media, and commercialization. Some top schools accept IB, but portfolios, on-campus exams, interviews, language, and the availability of English-taught programs vary quite a bit.
Fitting the Portfolio to the School
Schools and programs have all sorts of different hard requirements for a portfolio’s format. Different page counts, different size requirements; some ask you to upload images with no text on them, some accept video… the school website, the application system, the Slideroom page, and so on all need to be checked item by item. Please be sure to confirm this yourself on the official site, because portfolio requirements can change every year and vary a lot between programs.
Before you adjust for every school’s requirements, you can first build a portfolio master.
By the master I mean a relatively complete pool of work. It holds the master layouts of your most central projects, and can also keep some process materials and media. From that base, you then adapt the piece order, layout, size, and other special requirements to each school.
Here’s an example of the basic elements for presenting a piece:
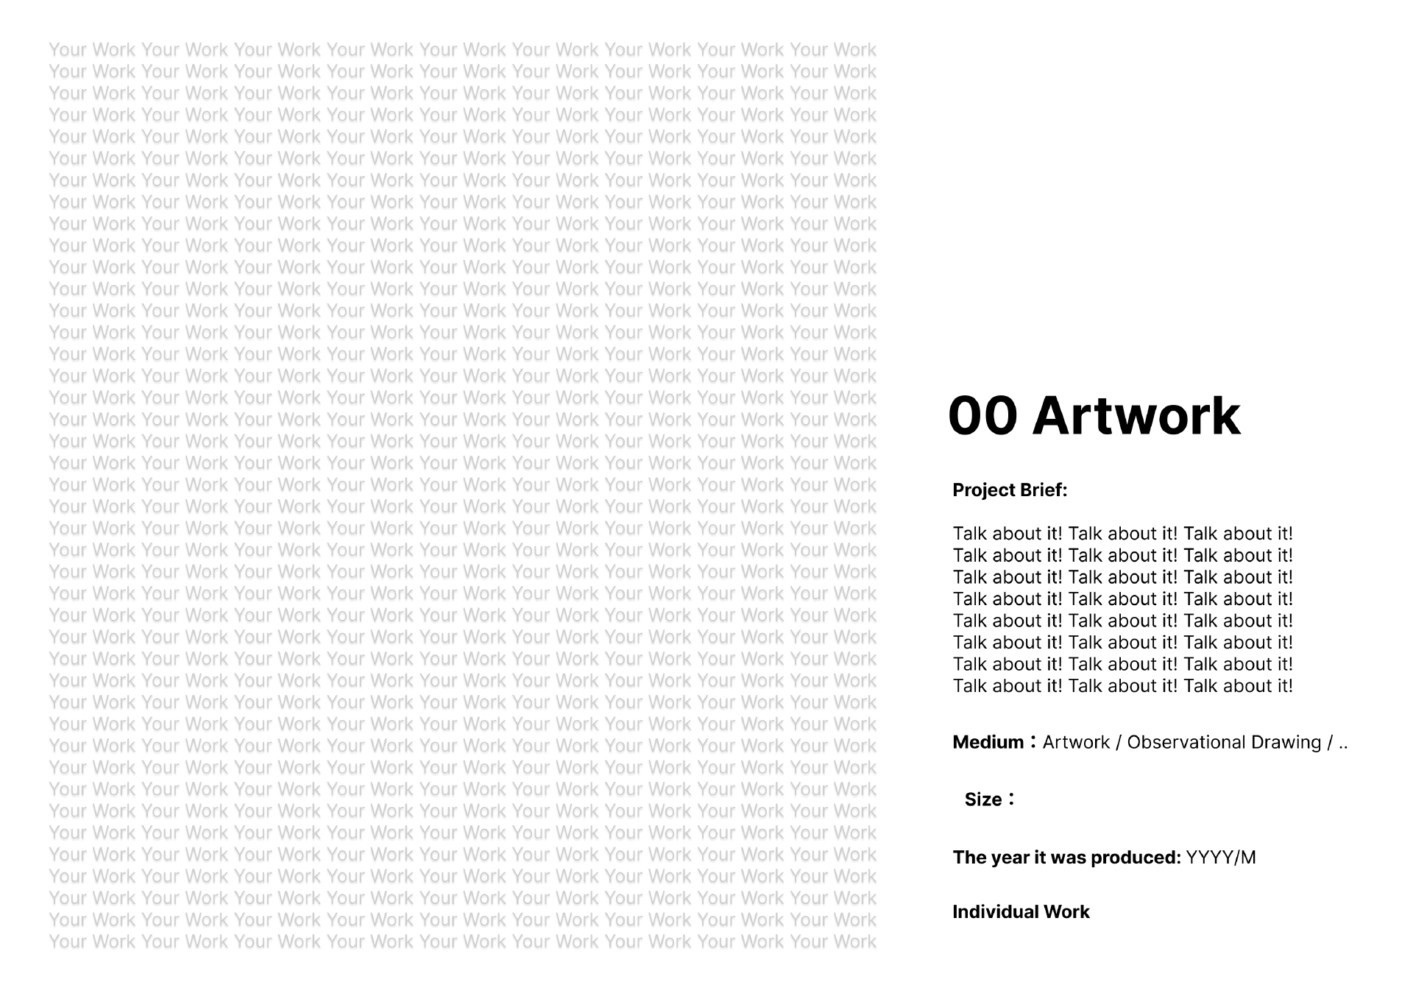
The basic elements are:
- Every piece should have a name. You can use numbers to show the order and count of the works.
- The Project Brief can briefly introduce what this piece is about.
- Medium here refers to the category of the work, not the material used.
- Size simply states the piece’s physical size.
- The year it was produced — just show the year and month.
- Individual Work indicates whether it’s your own creation.
On top of that, you can apply your own layout style.
Beyond this, different schools also have their own stylistic preferences. These are closely tied to their motto, their educational style, their curriculum, and so on. You can get a sense of them through things like the Digital Commons and Student Work Archive on the school’s site.
A portfolio doesn’t need to become something completely different for every school, but you also shouldn’t send the exact same content, unadjusted, everywhere. Just think of the hard requirements and stylistic preferences as readability you’re offering the admissions officers — giving them a suitable angle from which to enter your portfolio.
What Goes Into a Portfolio
Maybe you have a lot of ideas, and no shortage of finished work. So which pieces do you choose for the portfolio as a set?
When picking works, you can start by sorting them roughly into a few categories:
One category is main projects. These are the most relevant to the major you’re applying to and best show off your core abilities.
One category is foundational skills. These could be Observational Drawing (covered in more depth in the Observational Drawing section later), modeling, software, photography, or material experiments — showing you have the basic ability to study this major.
One category is supplementary expression. It doesn’t have to correspond directly to professional training, but it fills out the narrative, adding something tied to your personal feelings, your interest in a medium, or your creative temperament.
There’s no fixed ratio between these categories — you could even skip one of them entirely. It differs by major, by school, and by applicant.
On top of that, you can use three criteria to roughly judge whether a project deserves a place in the portfolio: material, layout, and room to grow.
Material refers to whether the project has enough content behind it. It doesn’t need to be very complex, but it should at least have a process that can be unfolded.
Layout refers to whether the project can be told clearly. The reader needs to understand why this project exists, what you did, and how it arrived, step by step, at the result it’s at now.
Room to grow is the project’s potential: is it an assignment that stalls right here, or does it have meaning and a path for future development? For a high-school-stage applicant, a project doesn’t necessarily have to reach a mature product or a finished work, but if it lets people see the possibility of continued exploration, testing, iteration, or entry into a real-world setting, it gives the admissions officer a glimpse of “what you’ll go on to do in college”.
Layout and Narrative
Finishing your projects and filtering them down doesn’t mean the portfolio is done — it only means you have the material for one. Each project standing on its own doesn’t mean they’ll still stand once combined. Order, pacing, text density, visual emphasis, the way the first page invites you in — all of it shapes how a reader understands the portfolio. Designing how it’s presented is a part that takes real care.
The creator always knows the tangled background and story behind a project, and knows why they made it — but other people don’t. Someone seeing the portfolio for the first time needs to be led from the unknown toward the known. That’s what the layout is for: to organize a reading path that guides them.
Taking the admissions officer by the hand into the world you want to show them, if only briefly — every page’s presentation of information should hold to that purpose. Try letting these questions keep you company through the layout process: if the admissions officer only spends a few minutes, what do you want them to see first? What at second glance? Which details are worth lingering on? Which things actually don’t need to be explained so fully?
When it comes to text, better too little than too much — unless the density is itself part of the narrative.
In the end, once the admissions officer has finished your portfolio, they should naturally be able to answer at least a few questions:
- What kind of person is this?
- Why do these projects exist?
- What research and attempts did you make?
- How did you make judgments along the way?
- Is there room to explore this project further, in college and beyond?
If the answers to these questions are all tucked into the experience of reading the portfolio, that’s excellent.
Before the final submission, you can ask a subject teacher at school, your Uni Counselor, a friend, or someone who isn’t familiar with the projects to take a look — to answer the questions above from a third-party perspective and give feedback on the reading experience. Subject teachers are good at the logic of the discipline, the Uni Counselor is good at the application narrative, and a friend or a stranger can check the most basic readability.
The Industrial Design Portfolio
Taking an industrial design application as the example to unfold here, my portfolio mainly included three kinds of content: Product Design, Observational Drawing, and Artwork.
Product Design
Product Design is the most central part of an industrial design portfolio.
For an undergraduate applicant, admissions officers won’t expect you to design a product that could go straight into mass production. What matters is the problem you’ve spotted, how you push it forward into a design, and whether that design still has room to keep developing.
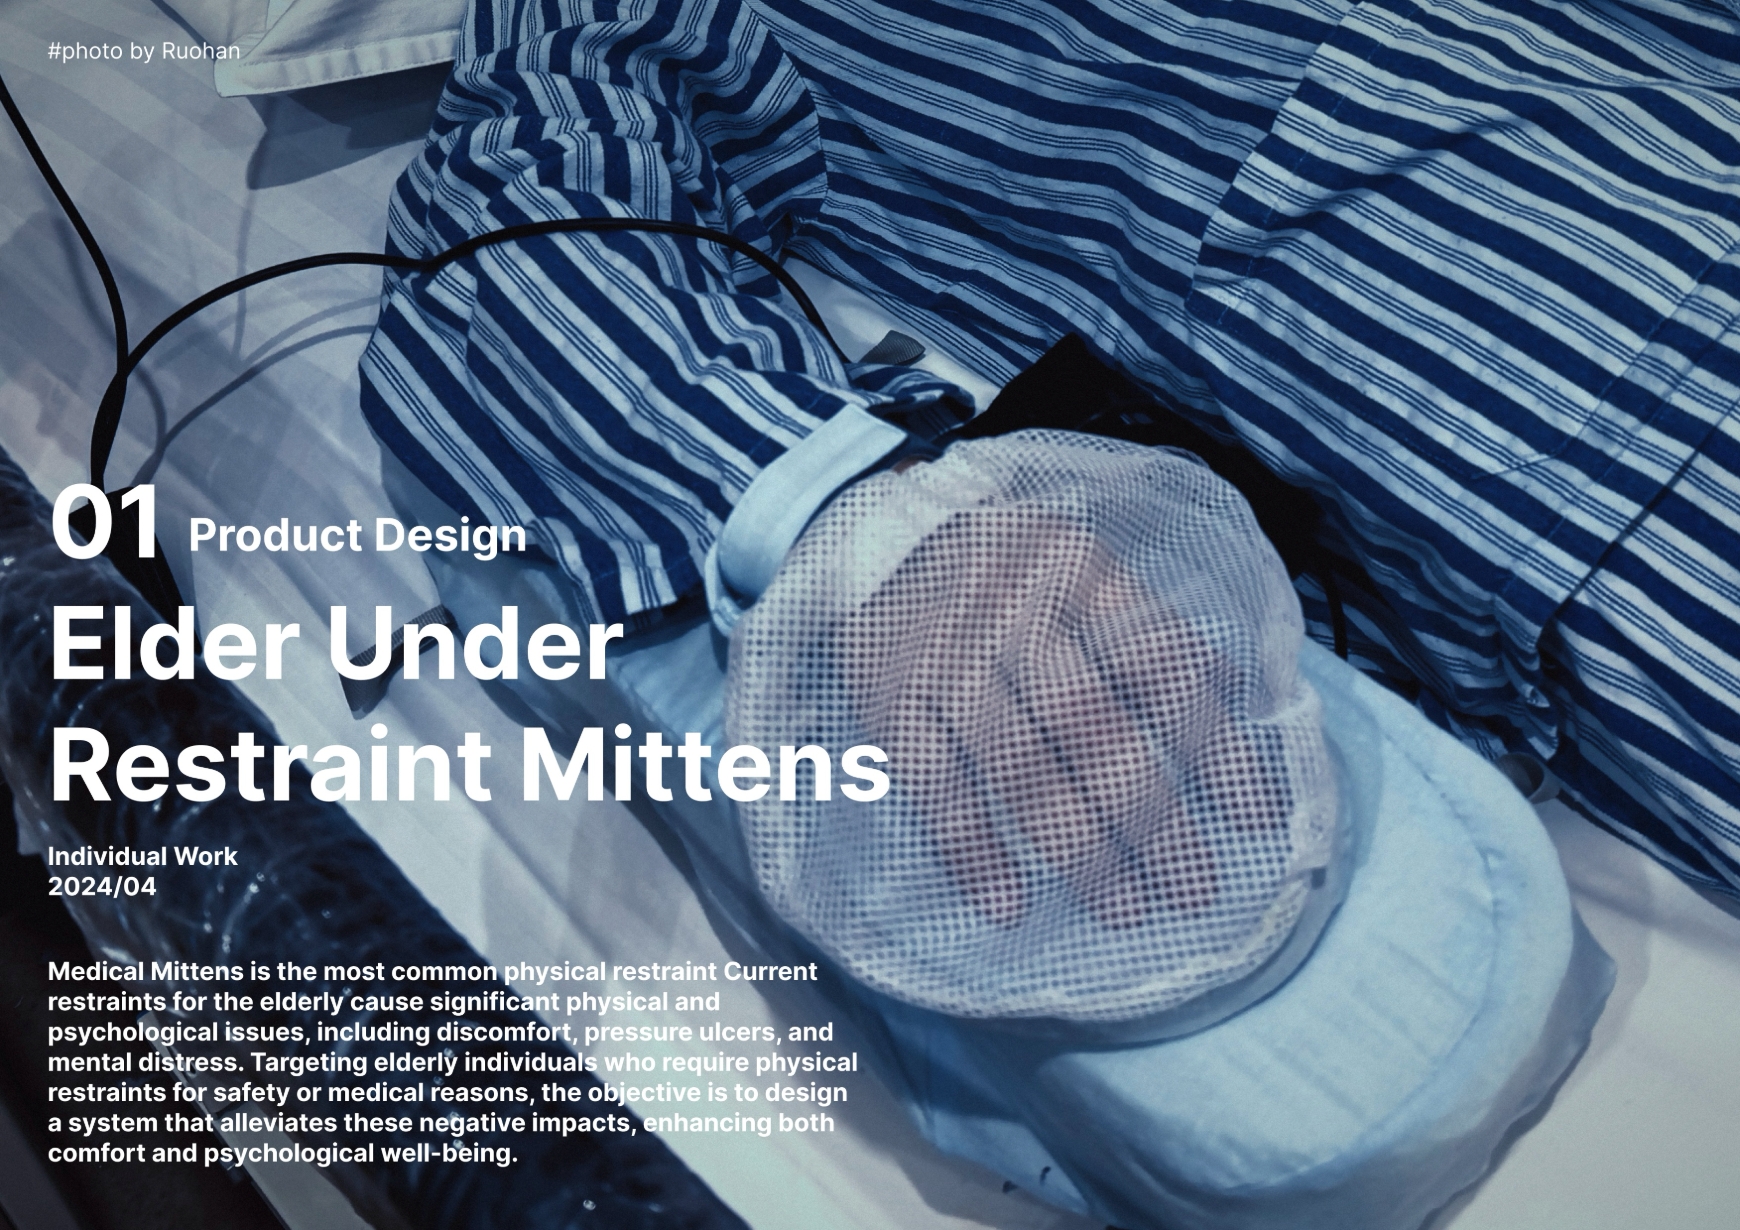
To introduce it at the level of basic form: this is the Intro Page for one of the projects in my portfolio. It has a few basic elements:
- The background image is a shot of the prototype being used in a real setting. The “#photo by xxx” explains where the photo came from.
- Beyond that, the title, the number, the project type (Product Design), the Individual Work statement, the date made, and the Project Brief together make up this Intro Page.
Since Product Design needs to show information beyond product images, each project can run a few extra pages.
I applied mainly to the US, to a mix of art schools and comprehensive universities, so my portfolio had two main ways of telling the story depending on the school.
Art Schools
The portfolio for art schools mainly unfolds the design through the logic of product pain points.
Rather than laying out research, sketch, model, and testing fully, step by step, the art-school version first drops the reader into the situation this product faces. It starts from a concrete pain point: who’s using this product? What discomfort, limitation, or overlooked need did they run into? Why is this problem worth redesigning around?
Take my project: the portfolio doesn’t open with pages of research material — instead, it enters through three pain points at the top of each page, and each pain point corresponds to a design response. That way the reader doesn’t have to read the full research first to understand why this product exists.
In this narrative, sketch, prototype, rendering, photo, etc. are distributed according to the pain points, each explaining how the design was pushed forward. The sketch shows how a thought turns from a pain point into ideas; the prototype shows whether the structure can actually be built; the rendering and the in-context photos help the reader imagine what the product looks like once it enters real use.
So in the art-school version, I compressed the process into a clearer visual narrative. There can be less text, but every piece of text needs to do something: point out a problem, explain a judgment, or help the reader understand the relationship between images.
Comprehensive Universities
The portfolio for comprehensive universities, on the other hand, is closer to the logic of the DT IA. If you’re a DT student, you may recognize these concepts:
- Define Your Problem
- Primary/Secondary Research (both Quantitative & Qualitative)
- Ideation through Sketch
- 3D Modelling (& Rendering)
- Concept Modelling (Different Fidelity Models)
- Testing with Feedback (both Quantitative & Qualitative)
All of the above can become part of a project. You can even include freer content: Experiments with different materials, your other skills (Coding, for example), and so on — any attempt that’s genuinely related to the work itself. But by the same token, they shouldn’t just be piled on as-is, and you don’t need to show every scrap of material in full. Let the reader see that you gathered information, filtered it, and rearranged it after some thought. The same goes for the use of technique: be mindful to show techniques that match the project itself, since content thrown in just to show off can actually expose a problem — that you don’t know how far a technique should be taken to make the product good enough.
At the same time, no matter how you choose to present it, the product’s own room to extend matters too. One of the projects in my portfolio, a palliative-care project, showed not just the current version of the product but also, at the close, the directions it could extend in the future: for elderly people facing visual impairment, hearing impairment, paralysis, or other conditions of disability, could my product develop different variants? As today’s young people grow old someday, do care products have to always be so gentle, so understated, so medicalized? This design has in fact become the project I’m now spending a Gap year pushing forward and bringing to life.
Observational Drawing
Observational Drawing is a foundational-skill requirement that shows up in a lot of art and design applications. As the name suggests, observation means you need to draw things and people observed from reality (not from photographs), and it’s about whether you can show, on the page, your judgment of proportion, structure, light and shadow, material, spatial relationships, and detail.
Because it’s fundamentally a rendering of reality, imagined scenes don’t really belong in it. If a small portion of the work wants to express a theme or make a special attempt, you can combine or splice real object A with real object B — for instance, an actual ocean scene set beyond an actual train scene, where both of them really exist, so that even if the combination doesn’t exist in reality, it still counts as Observational Drawing. By extension, you can do more creative splices and combinations, just as long as such pieces don’t make up the majority or drift away from the original intent of “Observation”.
As you prepare, try different mediums, sizes, and ways of observing. Charcoal, watercolor, pencil sketch, colored pencil… materials from the conventional to the unconventional are all worth trying in Observational Drawing. A piece can be as big as you are tall, or it can be a small-format gesture drawing (I’ve made pieces around 20×20cm, because that size was necessary: to capture the moment of a sunrise, only something small could be finished in time).
Here I’ll briefly introduce three basic types of training: gesture drawing (30 sec–2 min), sketching (5 min–30 min), and sustained study (several hours–several days). If you’re applying to architecture, landscape, industrial design, etc., gesture drawings and sketches (especially architectural sketches and perspective sketches) can show the speed of your ideation and making. If you’re applying to fine art or illustration, etc., then sustained studies with a personal style can show the admissions officer what kind of artist you are.
Different forms will prompt you to observe your subject in different ways, and can yield a richer range of results.
Coming back to how it functions in your presentation: Observational Drawing doesn’t need to carry any complicated theme. Truly seeing an object and drawing its form, texture, and spatial relationships clearly is a skill in itself. Of course, if you can naturally fold your own ideas onto that foundation of observation, this part of the work can take on a personal style too. The key is not to sacrifice the observation itself just to “have a theme”.
Artwork
In an industrial design portfolio, Artwork is the supplementary piece that fills out your “personal calling card”. As long as it doesn’t gild the lily or break the narrative, it can present a side of the applicant that doesn’t fully belong to the product process: personal experiences, the things you care about, explorations in thought and material, or other free expression.
For layout, just refer to the basic presentation elements from the section on fitting the portfolio to the school.
Tools
I hope the basics shared above give your work some direction without boxing in your creativity :3
As for the tools to build a portfolio, just pick whatever feels comfortable in your hands. Personally, the layout tool I use is Figma, because it makes resizing, organizing assets, and laying things out so convenient. I keep the main narrative thread noted down next to the portfolio master, and for each university’s version of the portfolio I jot down their hard requirements and stylistic preferences. You could just as well use Canva or another tool that suits you.
Beyond the Portfolio
Give it a try and get started! To close, I’d like to leave a small wish behind.
In this era, everyone is accomplished enough — accomplished to the point of overflowing. Is the line between getting in and not getting in even a clear one anymore? Maybe no one can say for sure. So please don’t treat it as a standard for judging yourself. What matters more is whether, in the process of preparing your portfolio, you come to understand yourself more and more clearly: What do I care about? What am I good at? What am I willing to put my time into? If the answers gradually come into focus, then no matter how the applications turn out, you’ll already have gained something far more lasting than an offer letter.
And what stays with you in the end isn’t a single milestone like a college application — it’s yourself, and the things you’ve made.
In this application season, which may not be all that fun, I hope you have a good time!